In this lab we will explore the sample TODO List application and create a pipeline in Jenkins to build and deploy our code.

As a learner by the end of this lesson you will be able to
The following tools are used throughout this exercise. Familiarity with them is not required but knowing what they are may help!
From the previous exercise; we created some supporting tooling needed by our app/
This lab requires users to take the sample TODO app and create a build pipeline in Jenkins by clicking your way to success ending up with an app deployed to each of the namespaces created previously
Import the projects into your gitlab instance. See README of each for build instructions
Deploy a MongoDB using the provided template to all project namespace.
Create 2 pipline with three stages (build, bake, deploy) in jenkins for develop & master branches on the todolist-fe such that:
Build job should:
develop for <yourname>-dev & master for <yourname>-test)${JOB_NAME}.${BUILD_NUMBER} from Jenkinsbake jobBake job should:
${BUILD_TAG} ie ${JOB_NAME}.${BUILD_NUMBER}.${BUILD_TAG}${BUILD_TAG}deploy job should:
${BUILD_TAG}${BUILD_TAG}Repeat the above setup for the backend todolist-fe. TIP - use the copy config to speed things up!
Verify that both apps and the DB are talking to one another as expected.
This is a fairly structured guide with references to exact filenames and sections of text to be added.
In this part of the exercise we will explore the sample application, become familiar with it locally before building and deploying in OCP Land
Git clone the todolist-fe project to somewhere sensible and checkout the develop branch.bash $ git clone https://github.com/springdo/todolist-fe.git $ git checkout develop
Create a new project (internal) in GitLab called todolist-fe to host your clone of the project and copy it's remote address. 
In your local clone of the todolist-fe, remove the origin and add the GitLab origin by replacing <YOUR_GIT_LAB_PROJECT>. Push your app to GitLabbash $ git remote remove origin $ git remote add origin <YOUR_GIT_LAB_PROJECT> $ git push -u origin --all
To get the app running locally; first check you've got node and npm installedbash $ node -v $ npm -v
NOTE - If you are missing these dependencies; install them with ease using the Node Version Manager

The todolist-fe has a package.json at the root of the project, this defines some configuration for the app including it's dependencies, dev dependencies, scripts and other configuration. Install the apps dependenciesbash $ npm install
The todolist-fe has some scripts defined in the package.json at the root of the project. To Run any of these scripts run npm run <SCRIPT_NAME>. Let's start by serving our application

bash npm run serve
This will take sometime to execute; but once done it should open the browser for you displaying the todolist-fe app.

The app is a todolist manager built in Vue.js. Play around with the App. You will notice when you add todos they appear and clear as expected. If you refresh the page you'll loose all additions. This is because there is persistence
The structure of the todolist-fe is as follows.bash todolist-fe ├── jest.config.js ├── jsconfig.json ├── nightwatch.config.js ├── node_modules ├── package.json ├── public │ ├── favicon.ico │ ├── img │ ├── index.html │ └── manifest.json ├── src │ ├── App.vue │ ├── assets │ ├── components │ ├── config │ ├── main.js │ ├── registerServiceWorker.js │ ├── router.js │ ├── scss │ ├── services │ ├── store │ └── views ├── tests │ ├── e2e │ └── unit └── vue.config.js
where the following are the important things:
./src is the main collection of files needed by the app. The entrypoint is the main.js which is used to load the root App.vue file../node_modules is where the dependencies are stored./test contains our end-to-end tests and unit tests. More covered on these in later labs../src/components contains small, lightweight reusable components for our app. These include the NewTodo component which encapsulates the styling, logic and data for adding a new todo to our list./src/store is the vuex files for managing application state and backend connectivity./src/views is the view containers; which are responsible for loading components and managing their interactions../src/router.js controls routing logic. In our case the app only has one real endpoint../src/scss contains custom SCSS used in the application../*.js is mostly config files for running and managing the app and the testsNow let's move on to the todolist-api and wire them together. As with the todolist-fe we need to clone the repo and add it to our GitLab in the cluster.bash $ git clone https://github.com/springdo/todolist-api.git $ git checkout develop
Create a new project (internal) in GitLab called todolist-api to host your clone of the project and copy it's remote address.
In your local clone of the todolist-api, remove the origin and add the GitLab origin by replacing <YOUR_GIT_LAB_PROJECT>. Push your app to GitLabbash $ git remote remove origin $ git remote add origin <YOUR_GIT_LAB_PROJECT> $ git push -u origin --all
Once pushed; explore the application. It is a NodeJS application with the Express.js framework and MongoDB for persistent storage. Same as before, the package.json defines most of the configuration etc. Install the dependenciesbash $ npm i
While the dependencies are being installed; explore the project structure.bash todolist-api ├── Dockerfile ├── Gruntfile.js ├── README.md ├── node_modules ├── package-lock.json ├── package.json ├── server │ ├── api │ │ └── todo │ ├── app.js │ ├── components │ │ └── errors │ ├── config │ │ ├── environment │ │ ├── express.js │ │ ├── local.env.sample.js │ │ └── seed.js │ ├── mocks │ │ ├── mock-routes-config.json │ │ ├── mock-routes.js │ │ └── mock-routes.spec.js │ ├── routes.js │ └── views │ └── 404.html └── tasks └── perf-test.js
where the following are the important things:
./server is the main collection of files needed by the app. The entrypoint is the app.js./node_modules is where the dependencies are stored./server/api is where the api's controller, data model & unit test are stored../server/mocks is a mock server used for when there is no DB access./server/config stores our Express JS config, header information and other middlewear../server/config/environment stores enviromnent specific config; such as connectivity to backend services like the MongoDB../tasks is a collection of additional Grunt tasks which will be used in later labspackage.json contains the dependency list and a lot of very helpful scripts for managing the app lifecycleThe npm scripts are shown below. There are application start scripts, build and test items which will be used in the build. The ones for MongoDB are just provided for convenience and require Docker installed to execute.json "scripts": { "start": "node server/app.js", "dev": "./node_modules/.bin/grunt serve", "jshint": "./node_modules/.bin/grunt jshint", "jshint:ci": "./node_modules/.bin/grunt jshint:ci_server", "clean": "rm -rf reports package-contents*", "build": "mkdir -p package-contents && cp -vr server Dockerfile package.json package-contents", "package": "zip -r package-contents.zip package-contents", "test": "node_modules/.bin/nyc node_modules/.bin/mocha server/**/*.spec.js --exit", "test:ci": "export MOCHA_FILE='reports/server/mocha/test-results.xml' && export NODE_ENV=ci && node_modules/.bin/nyc node_modules/.bin/mocha server/**/*.spec.js -R mocha-junit-reporter --exit", "mongo" : "docker run -i -d --name mongo-local -p 27017:27017 mongo", "mongo:drop" : "npm run mongo:stop && docker rm mongo-local", "mongo:stop" : "docker stop mongo-local", "mongo:start" : "docker start mongo-local" },
To run the application; start a new instance of the MongoDB by running.bash $ npm run mongo
npm run mongo:drop is used to completely remove the running container. npm run mongo:stop & npm run mongo:start will preserve data in the container
Fire up the todolist-api by running.bash $ npm run start 
Check things are responding correctly by running and checking the response. It contains some seeded data (stored in server/config/seed.js)bash $ curl localhost:9000/api/todos json [{ "_id": "5ac8ff1fdfafb02138698948", "title": "Learn some stuff about MongoDB", "completed": false, "__v": 0 }, { "_id": "5ac8ff1fdfafb02138698949", "title": "Play with NodeJS", "completed": true, "__v": 0 }]
Now let's check out todolist-fe app by reloading the browser. We should now see our dummy front end data is replaced by the backend seed data
In this exercise; we will create a build configuration for to generate a slave for Jenkins to use in it's builds
In order for Jenkins to be able to run npm builds and installs as we have done locally, we must configure a jenkins-build-slave for Jenkins to use. This slave will be dynamically provisioned when we run a build. It needs to have NodeJS and npm installed in it. In your enablement-cd-cd repository, checkout the template and configuration. This will bring in the template, the params & the Docerfile.bash $ git checkout exercise2/jenkins-slave docker/ templates/ params/
Open the params/jenkins-slave-npm file and update <YOUR_ENABLEMENT_GIT_REPO> accordingly. This set of parameters will clone from the enablement repo and run a docker build of the Dockerfile stored in docker/jenkins-slave-npm.bash SOURCE_REPOSITORY_URL=<YOUR_ENABLEMENT_GIT_REPO> SOURCE_CONTEXT_DIR=docker/jenkins-slave-npm NAME=npm-jenkins-slave
Create an item in the ansible variables file under the ci-cd-builds object to run the template with. Don't forget to substitute <YOUR_NAME>
```yaml
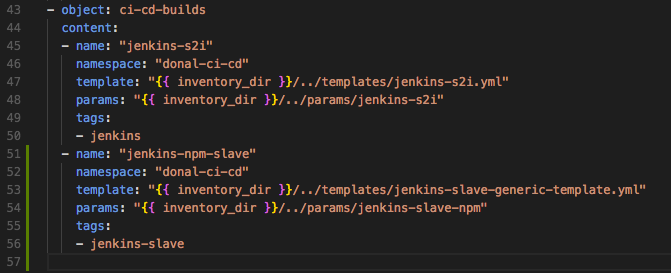
Run the OpenShift Applier to trigger a build of this jenkins slave image.bash $ ansible-playbook roles/openshift-applier/playbooks/openshift-cluster-seed.yml \ -i inventory/ \ -e "filter_tags=jenkins-slave"
Verify the build executed successfully by logging into the cluster and checking the builds tab of the <YOUR_NAME>-ci-cd project.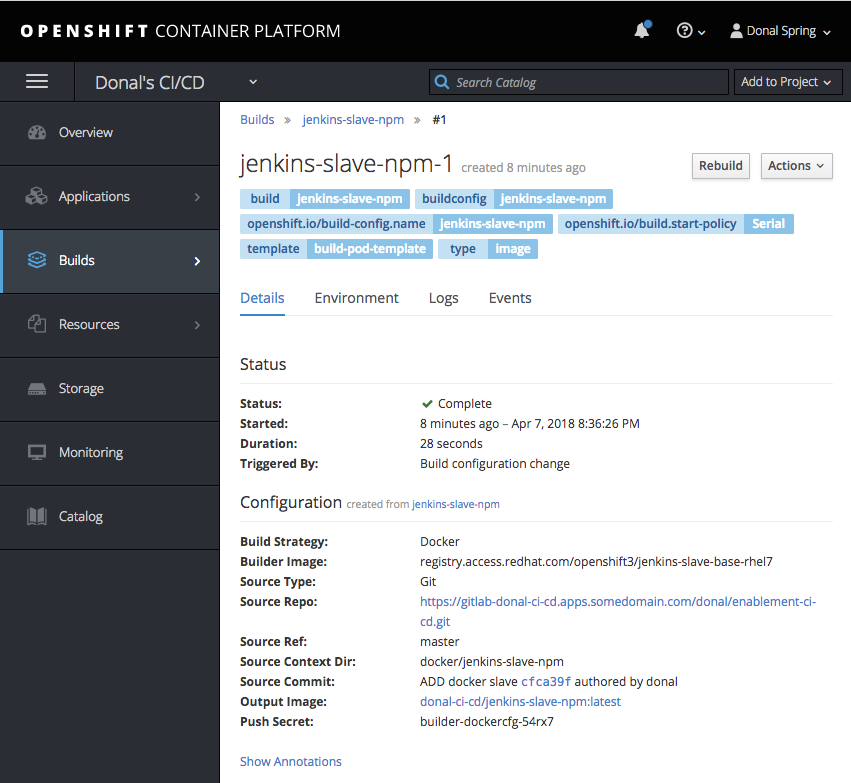
You should now be able to apply the label jenkins-slave-npm to a build job to run a build on this newly created slave as we will see in the rest of this lab
NOTE - Jenkins may need to be restarted for the configuration to appear. To do this; navigate to your jenkins instance and add /restart to the url.
In this exercise; we will use the OpenShift Applier to drive the creation of cluster content required by the app such and MongoDB and the Apps Build / Deploy Config
In this exercise; we take what we have working locally and get it working in OpenShift
With the Configuration & DB in place,
Do other things
Do other things
Do other things
Do other things
Do other things
Ideas for go-getters. Advanced topic for doers to get on with if they finish early. These will usually not have a solution and are provided for additional scope.
List of links or other reading that might be of use / reference for the exercise
link back to the deck for the supporting material
